The whole world of quality control
914 exhibitors from 31 nations and an increase in the number of trade visitors to 26809 reflect the 30th Control at the Stuttgart Exhibition Centre in figures. Visitors travelled to Stuttgart from 92 countries. This shows both the globalisation of production and how central this trade fair has become for the global market.

Dhis year's Control once again stood for the practical presentation of hardware and software for industrial quality assurance in all relevant production and distribution areas of companies.
Multisensor coordinate measuring technology continues to gain ground
At this year's Control, several manufacturers offered new possibilities for multi-sensor coordinate measuring technology. Hexagon, for example, presented the Optiv Dual Z, a coordinate measuring machine (CMM) with two independent Z axes. CMMs with only one Z-axis for optical and tactile processes often have the disadvantage that features located deep in the workpiece cannot be detected because the vision sensor system is in the way. The option for a rotary/swivel joint is another advantage in this configuration.
Werth also offers a 2-pinhole concept with the Scopecheck series. To avoid collisions with the workpiece, only the measuring quill is located in the working area. The two ceramic quills can be equipped with a wide variety of sensors. For example, the SP80 tactile sensors and a rotary/swivel joint can be exchanged with the SP25 measuring touch probe on the same quill, while the second quill is equipped with optical and tactile/optical multi-sensor technology.
Renishaw introduced the RVP (Renishaw Vision Probe) for the REVO-2 (5-axis measuring system). In some applications, non-contact measurement offers a clear advantage over traditional tactile measurement methods. Components made from thin sheet metal with a large number of holes down to 0.5 mm, as well as parts that are not suitable for tactile measurement, can be fully inspected using the RVP system. RVP also enables a significant increase in throughput.
Coating thickness measurement directly after coating application
The CoatMaster from Winterthur Instruments AG measures the coating thickness of wet, tacky, powdery and solid coatings in a non-contact and non-destructive manner immediately after application. The measurement is independent of the temperature and the color of the coating. The system, which operates according to the principle of thermal coating testing, measures coating thicknesses from a distance of 5 to 50 cm with a measurement duration of up to 200 µs. With a standard deviation of well below one percent, the device meets the requirements of a test equipment capability analysis. The system works without dangerous radiation sources, such as laser or X-ray, and is based on the thermal coating testing method. In this process, the coating to be examined is briefly heated non-destructively by exposure to light, while infrared sensors record the course of the surface temperature. The temperature decays with a characteristic dynamic that depends on the thermal properties of the coating and the coating thickness. In this way, coating parameters such as the coating thickness, but also the porosity, the thermal sheet resistance, the thermal conductivity and the thermal diffusivity can be determined quickly and reproducibly.
Free software for inspection and image correlation
GOM has been offering the GOM Inspect software for free use for several years now. This software serves as an evaluation tool, including 3D inspection and STL mesh processing. Now there is also the possibility to import CT data in the common native file formats. These voxel data (volumetric measurement data) are automatically converted into surface data. This conversion significantly reduces the time for the evaluation due to the reduced data volume.
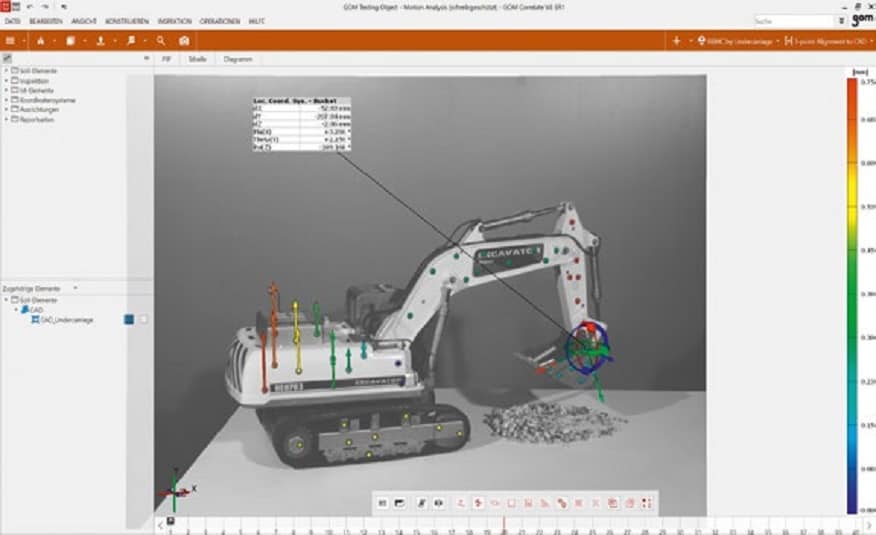
Another new product was GOM Correlate, a freely accessible analysis software that uses digital image correlation and 3D motion analysis to provide detailed evaluations of displacements, strains and deformations of components under load or in motion. The software can be used to read in film sequences or individual images and evaluate them in 2D. The files can originate from high-speed cameras, from optical and scanning electron microscopes and even from commercially available cameras and GoPros.
Mobile roughness tester
The Marsurf PS 10 mobile roughness tester from Mahr allows surfaces to be checked quickly. A touch display was used as the user interface, on which the operator selects the functions with his finger. The operation is
very similar to a smartphone. The device, which weighs just under 500 g, is an attractively priced entry into the standard measurement of surfaces. It is intended for use in the quality assurance of milled and turned parts, ground or honed workpieces and in incoming goods inspection.
3D measurements at high speed
Conventional 3D scanners are limited by the use of classical
projectors are limited in their ability to deliver very high acquisition rates. In the case of fast object deformations or when investigating fast processes, it is usually only possible to perform a comparison between the object shape in the initial state and after a change. However, a so-called nominal-actual comparison of these two states does not provide insight into the underlying deformation processes. The measuring system developed at the Fraunhofer Institute for Applied Optics and Precision Engineering IOF in Jena is able to realize a high recording rate. For the first time, more than 5500 independent 3D data sets of the object surface can be reconstructed by the system per second, each with more than 250,000 measuring points.
The measurement system is based on two high-speed cameras with a frame rate of over 13 kHz at a resolution of one megapixel. The cameras observe the measurement object in a so-called stereo arrangement, while the patterns necessary for the calculation are projected at a very high speed. The so-called projection wheel is a laser-cut metal mask with a stripe structure. Due to a specific defocusing and the motion blur resulting from the rotation of the wheel, a so-called aperiodic sine pattern is projected onto the measuring object and the 3D data of the measuring object is calculated from the camera images. To enable the short exposure times of only 2.5 µs, the light intensity of the projection unit (high-power gas discharge lamp) is crucial. As an example of such a measurement, the unfolding of an airbag can be seen in the figure.
The system is used for investigations in personal protection, especially in crash test research, motion analysis in medical research or sports science, the use in production lines for inline quality assurance at high cycle rates and for the measurement of large objects such as aircraft wings, ships or rotor blades of wind turbines.
Automated geometry measurement of micro gears
Alicona Imaging GmbH presented a new measuring solution for the automatic geometry measurement of micro gears in production at Control 2016. In combination with a motorized precision turning unit, the "InfiniteFocusSL" measuring system enables the evaluation of various parameters of a micro gear in the micrometer range (for example, deviations of the overall geometry, the areal deviation from the nominal flank as well as dimensional geometries such as tooth thickness and gap width), from the tooth root to the tooth tip. The presented solution is based on the focus variation method, which generates repeatable, high-resolution and traceable measurements even in a manufacturing environment.


