Augmented Reality in automotive engineering
Around six years ago, the objective in the body shop of Audi's Technical Development department was to significantly increase the efficiency of bolt marking on the column measuring machine. With a new laser projection system, the goal was successfully implemented at the Ingolstadt site.

The problem was as follows: At least four employees were needed to work with the column measuring machine, on which entire car bodies are measured. "We could only mark the bolts on this stationary measuring machine, but using it was not only time-consuming, because each point had to be set in X-Y-Z and the whole had to be marked with a marking needle, but also not very ergonomic, because the points often had to be marked in a stooped position under the vehicle," recalls Frank Kutschera, technical center manager for body construction at Audi in Ingolstadt. "We finally received the tip from VW Group Research to take a look at Werklicht from EXTEND3D. A bull's eye, because no other supplier met our requirements profile."
Cameras plus smart software
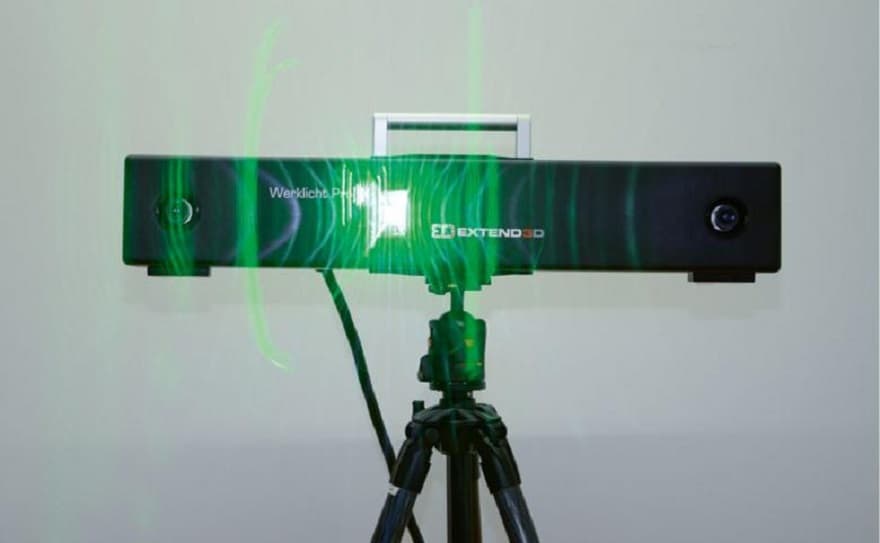
Werklicht - that's the name of the solution that will now not only increase efficiency at Audi when working on the stand measuring machine, but will also bring significant advantages in terms of flexibility and, above all, ergonomics. The solution comes from the Munich-based company EXTEND3D GmbH, which specializes in augmented reality for Industry 4.0. On the hardware side, the overall solution consists of two cameras and an industrial laser for projection. The heart, however, is a sophisticated software that connects digital 3D plan data with actual reality. First, existing CAD data from all common data formats are read in. With targets attached to the workpiece, the software compares the stored plans with the real body and establishes the reference. Both the workpiece and the projector can assume different positions - any movements are compensated for by the software in real time. The functional principle of Werklicht makes it possible, for example, to use laser or video projection to precisely mark work points or areas or to indicate information about work steps directly on the workpiece.
Special device at Audi
For stud marking with factory light, the car manufacturers in Ingolstadt have a special device - a so-called rotating grill - on which they can clamp the substructure. This not only makes them very flexible, but the projection can also be carried out while standing. Other applications include apertures, the display of contours or the inspection of components. Ultimately, the bodywork specialists can use the laser to display everything they receive in the way of data from the design department. The workflow is as follows: First, the component is clamped onto the rotary grill when the Ingolstadt specialists have to work all around. Then they assign the markers that Werklicht uses for measuring. Then they work through the projections.
Two instead of four employees
Werklicht offers the bodybuilders time and personnel advantages of approx. 50 percent each for scribing, making a total of 75 percent. Instead of four employees, only two are now needed. And in contrast to the column measuring machine, they can carry out the machining in half the time and are also spatially flexible. For the carmakers at Audi, however, another aspect is of great importance: They do not set bolts or position parts on CAD zero, because in prototype construction the parts are not yet so precise. The entire interaction across the large body is still under development - and it is precisely these inaccuracy errors that they calculate directly via the markers. In this way, the bolts can be positioned from the correct position for the vehicle body to the actual part position, thus avoiding subsequent reworking during assembly. By using Werklicht, the body builders eliminate this source of error - which of course also means a time advantage for them.
Production of Audi A3 and A4
In addition to technical development, Werklicht is also used in the production of the Audi A3 and A4 at the Ingolstadt site for the marking of series parts. In terms of functionality, this application is very similar to marking bolts, because positions are also transferred to the components from the CSV lists and then it is visually checked whether the welding points are correctly positioned or too close to the cut or somewhere out of tolerance. It must be taken into account that the area of joining technology involves certain complexities that can only be handled inflexibly and expensively with classic measuring and testing equipment - especially when one thinks of column measuring machines or test templates. The latter are often used in series-accompanying testing. They are not only expensive, but also have to be permanently maintained and always produced anew when changes are made to the component.
"In the past, we were inflexible with the stand measuring machine; we often had to rebuild so that the starting point pointed in the right direction. The Werklicht method of operation is faster and easier, and we have also become better than we expected in terms of accuracy," Frank Kutschera concludes positively.


